
Using Claude Artifacts to generate a custom data labelling tool
Tags: Prompt Engineering, Claude Artifacts, Data labelling
Categories: Blog
TLDR
Task: find a simple solution for assisted captioning of image data. Tentative captions are generated using multimodal LLMs as part of the Tex Willer comics generation project. These are hand-checked and refined for correctness and to match the formatting style.
Desiderata:
- Custom input/output folders where to collect images, tentative text, and output the revised text
- They layout should show the image in a sufficiently large size for the text to be readable. Moreover, the caption also needs to be loaded in an editable textbox
- Skip images that already have a manually-generated caption
- Highlight the presence of new lines (
\n) symbols in the text. We want the captions to place one text bubble per line - Create a shortcut for submitting the edit and showing the next image
Possible solutions: search the web for existing software that meets all the requirements above. Not all are strictly necessary, but most of them would make tagging much faster.
Alternative solution: we use Claude Artifacts to generate a custom html-driven tool that meets all the requirements above.
Outcome: making the tool took about 5 prompts and ~30m. Using it was extremely easy, it worked out of the box (no manual changes), and it had all the features exactly as I wanted them. It made my work much faster.
A bit longer explanation
Claude Artifacts is known to have strong performance when developing html-based tools such as the one I would need. It’s great because on top of creating the code, which any other code/reasoning model could do, it also previews the content for you, allowing you to interact with the webpage and test its functionality. However, there is a limit. Anthropic prevents you from interacting with the file system through the artifacts (as far as I know). Hence, I tested all its functionalities locally. Let’s see briefly how I achieved that.
A first attempt
To start off, I gave it a quite detailed prompt of what I wanted, and how I wanted it. You will notice that not all the features listed above are in this first prompt, as I understood better my requirements as I was experimenting.
Help me create a html+javascript page where I can do image labeling for vision tasks. Specifically, I need to create captions for images. I already have some generated caption for each image but I need to verify it by hand and update it if necessary. My data is organized as follow:
- img_path: folder containing all the images. Let an image be called {image_name}.png. Obviously without the curly brackets, that is just to let you undertsnd that the image name is variable
- caption_path: folder containing allcaptions. A caption is connected to a specific image through the filename: {image_name}_text.txt
- out_path: target folder where to store the result. Name each text as {image_name}_text_gt.txt This is how I want the layout to look, from top to bottom: A first section spanning the whole width where you find 3 row blocks, each block has the same structure: a button and a text field next to it. The button opens a folder selector window to pick the local directory, whose location will also be displayed in the corresponding text field. Each block will cater to a different path, hence you will have the three buttons named as:
- Add image path
- Add text path
- Add out path At the end of these three blocks, put a button “load” which will load the first image. Please make sure that only images that do not have a corresponding file caption in the out_path folder are loaded. This is so that I avoid captioning images twice. A second section divided on two columns:
- the left column is a the image preview, make this to occupy 70% of the width. The image should appear in the preview upon pressing load. The images are all .png files.
- The right column contains a textbox with the corresponding caption pre-loaded. Please automatically lower case the text. The third block contains only a centered button named “save and continue”. Upon clicking, I want you to execute these actions in order:
- Take the content of the textbox as save it to the out_path directory, matching the naming convention described above, that is {image_name}_text_gt.txt, where you replace {image_name} with the image filename (without the .png extension).
- Load a new image and its corresponding caption. Make sure you don’t select an image that already has a caption in the out_path directory. Final note: to seep-up things, make sure that I can move from the captioning textbox to the “save and continue” button by pressing Tab, so that I can then hit enter on the button itself, without having to use the mouse for it.
As i mentioned above, Claude Artifacts are particularly suited for this task as the interface automatically previews the generated html/js/css for you. Nevertheless, since mine relied on accessing files, I ported it onto my machine. This is how the result looked like
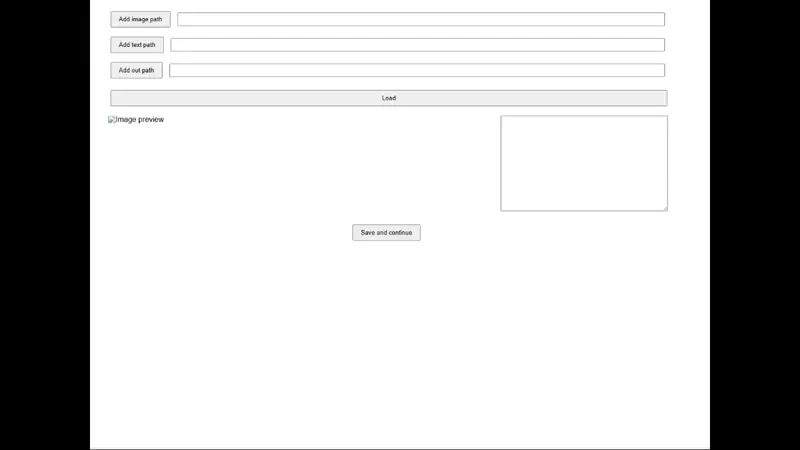
While it looks good, the browser kept on asking for authorization to store the file to disk. I would have expected for authorization to be required only once, but instead it kept asking for every operation. A brief google search did not fix the issue. Hence, I instructed Claude to fix it for me, and to also add the remaining features that I would be useful, especially the new line indicator. That took a couple of iterations to get right, but eventually the tools was complete.
The final version
This is the sequence of prompts that got me to the final result (I will skip Claude output and opt for a quick summary instead).
Prompt 1
Two changes:
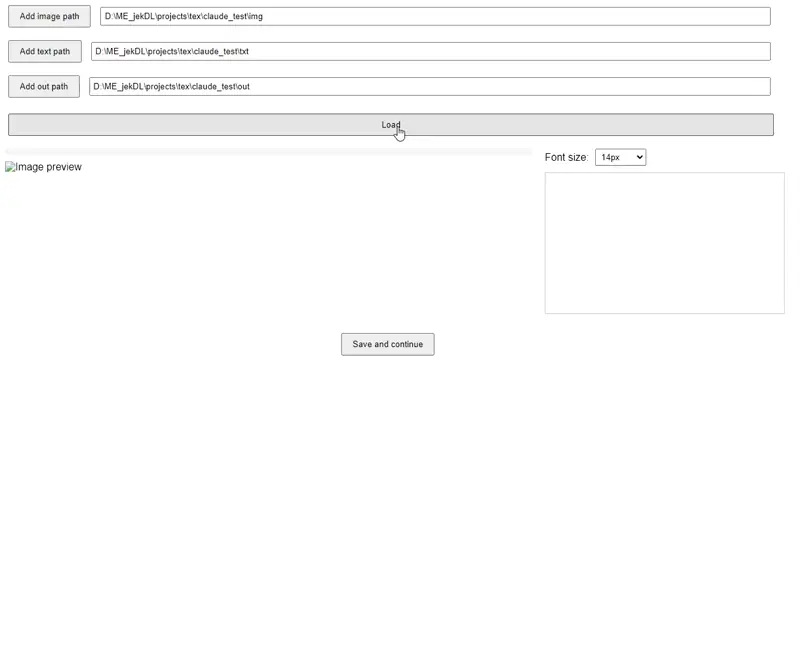
- I would like a label just above the image which shows the image filename
- every time I load a directory or save an image, the browser (Edge) asks me for authorization. Is there a way to give authorization once to access and save any file? That is sensibly slowing my development
Claude recommended several approaches, including an Express server using Node.js, or Electron to create a desktop application. I went for the latter one as it was new to me and I wanted to see what it was about.
Prompt 2
Yes please, let’s focus on electorn as it sounds simple
Here it explained the basic structure of an Electron project and created the necessary files matching the previous implementation. It also informed how to launch the app. It did not work out of the box, but I had the model debug it.
Prompt 3
I did as you said and got the following error
App threw an error during load ReferenceError: app is not defined at Object.(D:\ME_jekDL\projects\tex\claude_test\main.js:19:1) at Module._compile (node:internal/modules/cjs/loader:1271:14) at Module._extensions..js (node:internal/modules/cjs/loader:1326:10) at Module.load (node:internal/modules/cjs/loader:1126:32) at Module._load (node:internal/modules/cjs/loader:967:12) at c._load (node:electron/js2c/node_init:2:13672) at ModuleWrap. (node:internal/modules/esm/translators:171:29) at ModuleJob.run (node:internal/modules/esm/module_job:194:25)
I love having the model debug its own errors! It provided a simple fix to the error. Then, I proceeded with describing the remaining features that I was looking for, such as changing font size and identifying the new lines. Note that I let the model figure out what it thought was the best way to attack the new line “problem”.
Prompt 4
Very nice! Please make the following changes:
- allow me to change the font size in the caption textbox, next to the image. You can put like a standard drop down menu option just above the image itself, with a label next to it describing what the drop down menu does
- I need to know when new lines characters are present in the text. Right now the textbox wraps the text, which is the right behavior because I don’t want to have to horizontally scroll. However, it makes it hard for me to udnerstand when a new line begins or when the text is being wrapped. Please find a solution
The model first proposed the use of symbols next to the textbox, to identify newlines. This wasn’t sufficiently good. I then proposed back to use color to identify new lines, which it implemented very well.
Prompt 5
Better, but I think I need to see line breaks in the text itself. You can either use a specific symbol, or maybe red color the first word after a new line, or whatever you think it’s easiest to code and use
And here is the final outcome
I love how the new line color works! That was the single most useful feature. And it took me lees to make it than to look on Google for a free solution that would tick all the boxes.
- Guglielmo